
Create better access to health with machine learning and natural language processing. Read about the journey of developing Healthsea, an end-to-end spaCy pipeline for analyzing user reviews to supplementary products and extracting their potential effects on health.

🐤 Hello everyone, my name is Edward!
I’m a machine learning engineer at Explosion, and together with our fantastic team, we’ve been working on Healthsea to further expand the spaCy universe 🪐. In this blog post, I’ll take you on the journey of training different NLP models, creating custom components and assembling them into a spaCy v3 pipeline!
Table of contents
Important links
The complete spaCy project can be found on GitHub and includes all training data, components, and workflows. We also have some cool Healthsea demos hosted on Hugging Face spaces 🤗 that visualize the individual processing steps of the pipeline and also its results on real data.
| 🪐 Healthsea Codebase | spaCy v3 project with all training data and workflows |
| 📝 Healthsea Demo | Visualization of 1 million analyzed reviews with Healthsea |
| ✨ Healthsea Pipeline | Visualization of individual processing steps of the Healthsea pipeline |
| 🐾 Healthsea Model | Trained Healthsea pipeline hosted on HuggingFace |
🪐 Section 1: Introducing Healthsea
1.1 Creating better access to health
Healthsea analyzes user-written reviews of supplements in relation to their effects on health. Based on this analysis, we provide product recommendations for specific user queries. For many people, supplements are an addition to maintaining health and achieving personal goals. Due to their rising popularity, consumers have increasing access to a variety of products.
Supplements
A good example is Vitamin D3 (Cholecalciferol, one of four forms of Vitamin D) that is produced by our skin when exposed to UVB light (sunlight). Especially in winter and in places where you don’t have access to much sunlight, it’s often supplemented to prevent vitamin D3 deficiency and support a healthy lifestyle.
However, it’s likely that most of the products on the market are redundant or produced in a “quantity over quality” fashion to maximize profit. The resulting white noise of products makes it hard to find the right supplements.
To estimate potential health effects, it’s required to read and evaluate product reviews manually. With Healthsea, we aim to automate the analysis and provide information in an easily digestible way. ✨
1.2 What to expect
This blog post presents a technical approach to analyzing user reviews and acts as a proof of concept. We use spaCy’s built-in Named Entity Recognition and Text Classification capabilities to build and train an ML pipeline with custom-created components for Clause Segmentation and Entity Blinding.
Healthsea is an experimental project and the results should not be used as a foundation for solving health problems. Nor do we want to give the impression that supplements are the answer to anyone’s health issues. Nevertheless, exploring the data in this domain could be valuable when interpreted with care.
📝 Section 2: Understanding the problem
In this section, we’ll look at the structure of reviews, think about health effects, present our dataset, and lay the foundation for the project.
2.1 Deconstructing reviews
Most of the time, reviews are a good indicator of the quality of a given product. They can give interesting insights into taste, service, shipping, and especially in our healthcare domain: health effects. Based on that, the first challenge is to detect and filter reviews that are about health.
If you look at these examples, on which indicators do you base your decision whether it’s about a health topic or not?

We can use “joint pain” as an indicator because we associate it with a health-related problem. It is probably safe to assume that every mention of a health aspect (e.g. joint pain) is linked to a description of how the aspect is affected by the product (e.g. ”This is great for…”). The example ”Works wonders for my problem” describes an effect although it isn’t linked to anything specific other than “problem”. Thus, detecting specific aspects of health seems to be a good indicator for determining whether a review is health-related or not.
2.2 Health aspects
To find aspects of health, we need to define them. The first concepts that come to mind are diseases and symptoms, which you generally want to improve by ”decreasing” them. The ICD-11 (International Classification of Diseases) is a database that holds a wide variety of health information about diseases and symptoms. It provides an API that you can use to retrieve the data.
Reviews may also include more general health problems like ”pain when eating”, which we also want to detect even though they are not included in the ICD-11. However, terms like “pain”, “problem”, or “issue” are too generic and thus considered out of scope for this project.
We give the group of ICD-11 classified terms and general health problems the
label Condition.
We also want to detect health aspects that are neither a disease nor a symptom.
This makes my skin glow.
I can sleep much better now.
Increased my energy levels.
In contrast to the Condition label, these are desired health aspects that
you generally want to “increase”. These may also include general terms like
“Good for the heart”. Because they’re the opposite of the Condition label,
we need to define another label, we call it Benefit.
To sum it up, here are our guidelines for our two labels:

In some cases, it’s hard to determine whether a term should be considered a
Condition or Benefit. A good example is “weight loss” :
This caused weight loss.
Even though “weight loss” is classified in the ICD-11 (MG43.5), an increase of
this entity might improve the state of health for certain consumers while it
could also mean a deterioration for others. Because of these cases, we need to
include context in our decision to determine whether the consumer desires to
increase a certain health aspect or to decrease it. This determines whether we see the entity as a Benefit or a Condition, respectively.
2.3 Health effects
After we detected either Condition or Benefit entities, the next step is to
extract how they were affected by the product. When defining our two labels for
the health aspects, we used both terms ”increase” and ”decrease” as
indicators. We can further use them to classify the health effect as positive or negative:
- ”This increased my condition” →
Negative - ”This decreased my condition” →
Positive - ”This increased my benefit” →
Positive - ”This decreased my benefit” →
Negative
It’s possible that a health aspect was neither increased nor decreased,
indicating that it wasn’t affected by the product at all. We consider this a
Neutral effect. These cases often happen in combination with negations and
quantifiers.
- “Did not help condition/benefit.”
- “Increased benefit barely.”
Some reviews begin with customers writing about their current state of health
and describe the effects of the product in later sentences. This adds an extra
layer of complexity because now we need to connect health aspects to health
effects across the review. For these cases, we add an additional Anamnesis
class, which we’ll use as a temporary cache to collect and link the relevant information together.
The term anamnesis is generally
used in medical contexts and describes the medical history of a patient. In our
case, we rather have normal consumers than ‘real’ patients who are in need of
medical care. However, for this project, we’ll be borrowing the term to classify
statements that describe the current state of health of a consumer. You can read more about
the Anamnesis class in section 4.5.

There are some examples where it can get tricky to decide whether it’s an
Anamnesis or a Negative effect:
- “I’m diagnosed with joint pain.” →
Anamnesis - “I’m diagnosed with joint pain because of this product.” →
Negative
As for the health aspects, it’s also important to include the context into the classification of health effects. To sum it up, here are our four exclusive classes for health effects.

2.4 Data is everything
Having a good dataset is fundamental for building machine learning projects, and it’s not easy to get the data you need, especially in good quality and enough quantity.
For our project, we’re using data from iHerb, an online supplement market. The dataset contains up to 1 million anonymized reviews of 10.000 products and holds useful meta-information like product rating and helpful count, that can be used for scoring later. The data also includes product substances giving us the ability to make product and substance recommendations.
In terms of data cleaning, we filtered all non-English reviews, excluded all reviews with a word count below a certain threshold, and formatted them to utf-8 to prevent format errors in the future.
Reviews also contain a product id, which helps us connect found health effects directly to the product. There are some exceptions where customers talk about other products in their reviews.
Usually, I get constipation from other zinc products.
Since those cases are relatively rare in the dataset, this project focuses on extracting the health effects of the specific product under review only. But still, it would be a great addition in the future to link found health effects to other related products that were mentioned in the text. (Cough, cough Coreferee 😏)
2.5 We go full pipeline
As we can see, our analysis can be segmented into smaller processing steps: Detecting health aspects, classifying health effects, summarizing all information, etc.
That’s why we’re implementing them as an end-to-end pipeline, in which we can add modular components which only focus on one task. This makes it much easier to implement changes in the future, and add more processing capabilities without thinking about complex dependencies across the pipeline.
✨Section 3: Named Entity Recognition
To detect health aspects, we use
Named Entity Recognition,
which is the task of identifying non-overlapping spans like proper nouns and
similar expressions in text. We’ll use spaCy’s built-in NER architecture to
train our own model with two labels: Condition and Benefit.
Considering the varied nature of the Benefit and Condition entities,
including both named diseases as well as general health conditions, another
option would be to use the recently introduced
spancat component instead of the NER. We
leave this exercise up to the reader.
3.1 Annotation rules
Annotating data is the first step to training a model, and it’s crucial to think about consistent annotation rules beforehand. We can use the rules we defined for the health aspects in section 2.2. During annotation, we will make sure to take entities into account that consist of multiple words/numbers (diabetes type 2) and abbreviations like “ADHD”(attention deficit hyperactivity disorder).
Annotation guidelines help to keep consistency in the dataset, especially when having multiple annotators. It provides good insights into your data and helps to get an overview of all possible cases.
For this project, we use Prodigy to annotate the data, but of course, you can use any annotation method you prefer.
3.2 Prodigy
Prodigy is a powerful annotation tool powered by active learning which enables you to handle various NLP tasks such as Named Entity Recognition, Span Categorization, Text Classification, and also tasks outside NLP such as Computer Vision and Audio.
The visual interface makes it easier to annotate and handle large chunks of data while also increasing efficiency by providing special recipes for your current task. The progress bar, annotation history, and meta information are the quality-of-life features that help to keep the big picture of your project in focus.
Besides the visual interface, with its continuous active learning system, you’re also saving time because you only have to annotate cases that your model doesn’t already recognize. For more information about Prodigy you can visit the homepage.

A cool small feature is the new dark mode (by Damian and me 😏) which you can
easily enable in the prodigy.json by adding "theme":"dark".
There’s also an awesome video from Ines, where she goes through the whole process of annotation and training an NER in Prodigy. It covers how to bootstrap your annotation workflow by using initial seed words, training temporary models, and utilizing active learning.
3.3 Annotation
Our annotations for the NER model include 5060 examples with 1893 examples that mention one or more entities and 3167 with no entities:
| Examples | Total | Percentage |
|---|---|---|
| With entities | 1893 | 37,41% |
| Without entities | 3167 | 62,59% |
| 5060 | 100% |
| Label | Total | Unique |
|---|---|---|
Condition | 1712 | 715 |
Benefit | 1252 | 282 |
| 2964 | 997 |
It’s important for the NER model to also have examples with no entities. They
help the model to generalize better and show contexts in which terms should not
be considered as Condition or Benefit.
- ”Shipping took 2 months, what a pain in the a**” → Not a
Condition
We use Prodigy to export the annotations directly into the spaCy training format and apply an evaluation split of 25%.
If you’re curious, here are the top 10 most frequently mentioned Condition and Benefit
entities in the annotation dataset!
| Condition | Total |
|---|---|
| anxiety | 43 |
| cold | 42 |
| constipation | 35 |
| blood pressure | 34 |
| inflammation | 32 |
| flu | 31 |
| bloating | 30 |
| acne | 28 |
| stress | 28 |
| allergies | 20 |
The fact that “blood pressure” is considered a Condition is very interesting.
Most of the consumers want to decrease their blood pressure to achieve an
improvement, which makes it a Condition.
| Benefit | Total |
|---|---|
| skin | 224 |
| sleep | 179 |
| hair | 89 |
| energy | 77 |
| nails | 48 |
| immune system | 35 |
| mood | 23 |
| digestion | 21 |
| immunity | 20 |
| weight loss | 19 |
3.4 Training
With our training data annotated, we can now start training our NER model! The new spaCy v3 introduces a config system, which allows you to manage all hyperparameters and settings of your pipeline in a single file. If you’re interested to learn more, you should definitely check out Lj’s blog post about the spaCy config and spaCy projects 🥳.
For now, our pipeline consists of a
Tok2Vec and an
EntityRecognizer component.
NER config file (excerpt)
You can use embedding layers in two different ways: you can either have them as a standalone component that can be shared by different components downstream or include them directly inside the model of a downstream component. In this example, we’re initializing the Tok2Vec as a standalone embedding component. We’ve prepared three configurations with different embeddings to evaluate on:
- Tok2Vec embeddings
- Tok2Vec embeddings with pre-trained vectors
- Transformer embeddings (albert-base-v2)
We use spaCy’s pretraining to train our own word embeddings on the iHerb corpus. These pretrained weights will be used to initialize our Tok2Vec component in the next phase. The weights are available in the Healthsea project. More about spaCy’s pretraining here.
Pretraining section
You’ll need to load the pretrained weights into the init_tok2vec variable. You
can do it directly under the paths section or override per command line.
Now we can just go and run spacy train config.cfg ✨
3.5 Evaluation
We use Weights & Biases to track our training results. By changing the [logger] in the config
file, you can easily integrate wandb into your spaCy training. For more
details, see the
documentation and
blog post.
Changing the training logger
Let’s start by looking at pretraining vs. non-pretraining.

We see that pretraining helps the model to perform slightly better and boosts accuracy early in training. Both achieve an average F-Score of almost 0.8 (which is great ✨).
| Label | Measure | Pretraining | Non-Pretraining | Difference |
|---|---|---|---|---|
| Condition | F-Score | 0.78 | 0.79 | 0.01 |
| Condition | Precision | 0.78 | 0.79 | 0.01 |
| Condition | Recall | 0.79 | 0.78 | 0.01 |
| Benefit | F-Score | 0.81 | 0.78 | 0.03 |
| Benefit | Precision | 0.82 | 0.78 | 0.04 |
| Benefit | Recall | 0.79 | 0.78 | 0.01 |
| Speed | 40927 | 41337 | 410 |
When comparing the pretraining with a transformer, we can see a bigger difference.
The transformer performs much better than the pretraining but with a much slower
runtime as a trade-off. The boost in performance can be mainly attributed to increased recall and precision for Condition entities:
| Label | Measure | Pretraining | Transformer | Difference |
|---|---|---|---|---|
| Condition | F-Score | 0.78 | 0.85 | 0.07 |
| Condition | Precision | 0.78 | 0.83 | 0.05 |
| Condition | Recall | 0.79 | 0.86 | 0.07 |
| Benefit | F-Score | 0.81 | 0.82 | 0.01 |
| Benefit | Precision | 0.82 | 0.83 | 0.01 |
| Benefit | Recall | 0.79 | 0.80 | 0.01 |
| Speed | 40927 | 5094 | 35833 |
🐾 Section 4: Clausecat
For classifying health effects to one of our four exclusive classes Positive,
Negative, Neutral and Anamnesis, we use Text Classification. Our aim
is to have a model that exploits the training data to learn which words indicate
an ”increase”, ”decrease”, or neither.

It should learn words and contexts which are unique to classes (”diagnosed
with” → Anamnesis) and also those that don’t influence the prediction at all.
4.1 Clause Segmentation
The examples shown above are relatively simple, but in reality, reviews can be much more complex. At the moment, our current approach is to feed whole sentences into our classifier. However, what do we do if sentences contain more than one health aspect?
This is great for joint pain but it also causes rashes.
If we were to feed this sentence into a typical text classifier, we’d only get
one prediction for the whole sentence. But for our use case, we’d like to have two predictions: one for
joint pain and one for rashes. To accomplish that, we segment the sentence
into two clauses:

Now we have two individual clauses that each contain exactly one health aspect. Perfect! With this, we can feed those two sentences directly into our classifier 🥂.
But what about this example?
This is great for joint pain but not hip pain.
If we were to split the sentence after the conjunction “but” we would end up with: ”This is great for joint pain”, and ”Not hip pain”
In this case, we would lose important information about the second clause which makes it impossible for the Text Classification to predict the correct class. Instead of splitting, we create two versions of the same sentence to avoid losing information:

Blinding
In the above example, the relevant Condition entities for classification have been masked, or “blinded”, with a generic token _CONDITION_.
A nice side effect of using blinding is that it also helps the model to
generalize better. With blinding, it doesn’t matter which kind of disease or
desired aspect a certain entity is. For the classification of the final effect, it’s only important
to know the entity’s label (Condition or Benefit).
4.2 Benepar
To implement the Clause segmentation, we use the Benepar parser, a spaCy universe component that performs Constituency Parsing by Nikita Kitaev. We use a constituency parser instead of spaCy’s built-in dependency parser because constituency parsing provides more details around coordination structures, which is helpful for clause segmentation rules. You can try out a demo of the Benepar parser here.
The Benepar pipeline saves the generated information, such as the tree, in
custom user attributes. One of them is the string representation of the nested
tree in the custom Span attribute
._.parse_string.
import spacyimport benepar
nlp = spacy.load("en_core_web_lg")nlp.add_pipe("benepar", config={"model": "benepar_en3"})
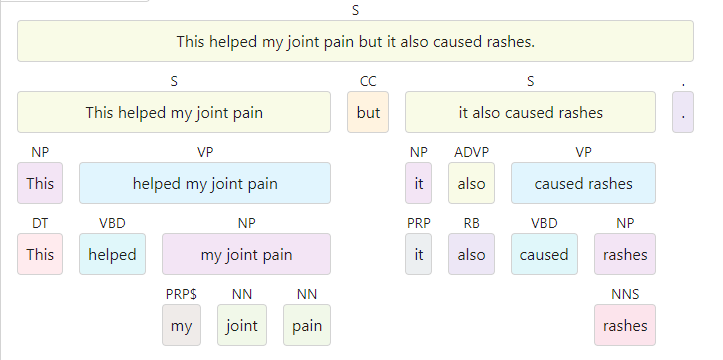
doc = nlp("This is great for joint pain but it also caused rashes.")
for sentence in doc.sents: print(sentence._.parse_string)
>> (S (S (NP (DT This)) (VP (VBZ is) (ADJP (JJ great) (PP (IN for) (NP (NN joint) (NN pain)))))) (CC but) (S (NP (PRP it)) (ADVP (RB also)) (VP (VBD caused) (NP (NNS rashes)))) (. .))4.3 Segmentation component
A spaCy pipeline is a sequence of
components that takes in text and returns a
Doc object. Doc objects are containers
for accessing linguistic annotations and hold a sequence of
Token objects.
The very first component of every pipeline is the
tokenizer, which
segments the text into tokens and creates the Doc container around them. The
Doc is then processed sequentially by all components in the pipeline.

Check out the free spaCy course for a closer look into spaCy’s pipeline architecture. 🎉
In our current pipeline, we already have our NER model and its tok2vec embedding component. We now need a custom spaCy component that performs our split-and-blinding logic based on the results of the Benepar and NER.
Let’s start building this custom component by creating the ClauseSegmentation class.
Every
spaCy component
requires a __call__() method in which Doc objects are processed and returned.
In our __call__() method, we create the custom method benepar_split() to get
a list of indices where we want to split the sentence into smaller clauses.
def benepar_split(self, doc: Doc) -> list[tuple]:    """Split a doc into individual clauses    doc (Doc): Input doc containing one or more sentences    RETURNS (List[Tuple]): List of extracted clauses, defined by their start-end offsets    """    split_indices = []    for sentence in doc.sents:        can_split = False        for constituent in sentence._.constituents:            # Store start/end indices of clauses labeled "S" (Sentence) if their parent is the original sentence            if "S" in constituent._.labels and constituent._.parent == sentence:                split_indices.append((constituent.start, constituent.end))                can_split = True
        # If no clause found, append the start/end indices of the whole sentence        if not can_split:            split_indices.append((sentence.start, sentence.end))
    return split_indices
We use the Benepar indices to generate Span objects that represent our
splits. A Span is a slice of a Doc that defines an entity, including its
offsets and label. We use them to apply our blinding logic. For every entity, we
create a version with the entity blinded with either _CONDITION_ or
_BENEFIT_.
We add underscores ”_” to make sure they stand out because some reviews already include the words “Condition” or “Benefit” as part of the content.
class ClauseSegmentation:  """Use the benepar tree to split sentences and blind entities."""
  def __init__(self, nlp: Language, name: str):      self.nlp = nlp      self.name = name
  def __call__(self, doc: Doc):      """Extract clauses and save the split indices in a custom attribute"""      clauses = []      split_indices = self.benepar_split(doc)
      for index_start, index_end in split_indices:          current_span = doc[index_start : index_end]          if len(current_span.ents) != 0:              for entity in current_span.ents:                  clauses.append(                      {                          "split_indices": (index_start,index_end),                          "has_ent": True,                          "ent_indices": (entity.start, entity.end),                          "blinder": f"_{entity.label_}_",                          "ent_name": entity.text,                          "cats": {},                      }                  )          else:              clauses.append(                  {                      "split_indices": (index_start,index_end),                      "has_ent": False,                      "ent_indices": (0, 0),                      "blinder": None,                      "ent_name": None,                      "cats": {},                  }              )
      # Check if ._.clauses exists and only overwrite when len() == 0      if not doc.has_extension("clauses") or (          doc.has_extension("clauses") and len(doc._.clauses) == 0      ):          doc.set_extension("clauses", default={}, force=True)          doc._.clauses = clauses
      return doc
Now we’ve defined our component that segments sentences into clauses and blinds entities. To be able to use this in our config file, we need to register it in the registry:
@Language.factory("healthsea.segmentation.v1")def make_segmentation(nlp: Language, name: str): return Clause_segmentation(nlp, name)In ._.clauses , we’re saving a list of dictionaries that hold the following
information for each clause in the sentence:
split_indices(tuple[int,int]) - Start and end index of the clausehas_ent(bool) - Whether or not the clause contains entitiesent_indices(tuple[int,int]) - Start and end index of the condition/benefit entityblinder(str) - String that is used to blind the entityent_name(str) - The original term of the entity, used for aggregation latercats(dict) - Dictionary to save predictions (Positive,Neutral,Negative,Anamnesis)

4.4 Clausecat component
For the final classification of the health effect, we’re modifying the built-in textcat component to
support our Blinding and Segmentation logic. We give it the name Clausecat.
We’re also creating a custom Thinc model in which we chain
a custom blinder layer to the existing textcat model. The blinder uses the
information stored in ._.clauses to segment incoming Doc objects and apply
the Blinding to entities. The modified Doc objects are then fed into the textcat
model that performs the classification. To return the original Doc, the
Clausecat component aligns the predictions to the segmented clauses and back to
the parent Doc. The predictions are saved in ._.clauses.
@registry.architectures("healthsea.clausecat_model.v1")def build_clausecat(  blinder: Model[list[Doc], list[Doc]], textcat: Model[list[Doc], Floats2d]) -> Model[list[Doc], Floats2d]:  """  Build a wrapper model that chains a blinder layer and a textcat model  """  with Model.define_operators({">>": chain}):    model = blinder >> textcat  return model

@registry.layers("healthsea.blinder.v1")def build_blinder() -> Model[list[Doc], list[Doc]]:  """  Build a blinder layer that uses the custom attribute ._.clauses  to split docs into clauses and to blind entities  """  return Model(    "blinder",    forward=forward,  )
4.5 Aggregation component
The aggregation component merges the predictions of the Clausecat and creates the patient information cache for linking health aspects to health effects. Health aspects may be mentioned more than one time in a review, thus having more than one prediction about health effects.
- ”I used this product for my joint pain. It really helped my joint pain” ->
Neutral,Positive
The component aggregates multiple predictions into one final classification and
groups them to the specific health aspect. We save the aggregation to the custom
attribute ._.health_effects, a dictionary with the entity names as keys and
the predictions as values. Whenever the Clausecat predicts the Anamnesis class
for a certain health aspect, it is saved in a list that acts as our patient
information. Since we also predict sentences that don’t include health aspects,
we can classify sentences like these as Positive : “This product really
helped!” Whenever we find Positive or Negative classifications that come
after the Anamnesis, we link them together.
@Language.factory("healthsea.aggregation.v1")def create_clause_aggregation(nlp: Language, name: str): return ClauseAggregation(nlp, name)In ._.health_effects we’re saving a list of dictionaries that hold the
following information:
key: entity name (whitespaces are replaced with ”_” and .lower())
effects(list[str]) - List of predictions found in the revieweffect(str) - Aggregated classificationlabel(str) - Predicted label of the NERtext(str) - Original entity text
Annotation rules
As for the health aspects, we can use the guidelines defined in Section 2. Here’s a quick recap:
4.6 Annotation
Before we annotate the data for the Clausecat, we preprocess them the same way the Clausecat model will see it while training. This means that we segment reviews, blind entities, and then annotate them.
- This helps against inflammation → This helps against _CONDITION_
We create a custom corpus reader that formats the resulting annotations into our desired format for the Clausecat. Corpus readers are used for importing training data and you can create your own readers to support any file type.
The average product rating of the IHerb dataset is 4.5 stars which indicates that most of the reviews are about positive effects. This causes an imbalance that we can see in our annotation set. To make sure that the imbalanced classes are equally distributed across the training and development data, we’re splitting the dataset per label individually.
| Label | Total | Training (75%) | Development (25%) |
|---|---|---|---|
Neutral | 2268 (45%) | 1701 | 567 |
Positive | 2006 (40%) | 1505 | 501 |
Anamnesis | 414 (8%) | 311 | 103 |
Negative | 291 (7%) | 219 | 72 |
It’s a great idea for a follow-up blog post to evaluate how performance can be further improved by annotating more Negative & Anamnesis examples or by upsampling them during training.
4.7 Training
Let’s create our final pipeline with all the new components! We start by sourcing from the NER model that we trained before.
Sourcing NER components (excerpt)
For the Benepar to work, we add an additional sentencizer component that creates sentence boundaries. We then add the Benepar, Segmentation, Clausecat, and Aggregation so that we end up with this pipeline:
Final pipeline (excerpt)
In the [corpora] section we assign our custom corpus reader:
Corpus reader
We have two different configurations for comparing the training results:
- Tok2Vec embeddings
- Tok2Vec embeddings with pre-trained vectors
Now we can just go and run spacy train -c custom_code.py ✨
4.8 Evaluation

We see that pretraining improves the performance of the clausecat much more than it did for the NER model.
| Label | Measure | Pretraining | Non-Pretraining | Difference |
|---|---|---|---|---|
| Positive | F-Score | 0.82 | 0.78 | 0.04 |
| Positive | Precision | 0.78 | 0.72 | 0.06 |
| Positive | Recall | 0.86 | 0.85 | 0.01 |
| Neutral | F-Score | 0.85 | 0.82 | 0.03 |
| Neutral | Precision | 0.87 | 0.87 | 0.00 |
| Neutral | Recall | 0.82 | 0.77 | 0.05 |
| Negative | F-Score | 0.65 | 0.49 | 0.16 |
| Negative | Precision | 0.75 | 0.61 | 0.14 |
| Negative | Recall | 0.58 | 0.41 | 0.17 |
| Anamnesis | F-Score | 0.63 | 0.53 | 0.10 |
| Anamnesis | Precision | 0.71 | 0.59 | 0.12 |
| Anamnesis | Recall | 0.57 | 0.49 | 0.08 |
The classes Negative and Anamnesis perform very poorly in comparison to the
other two classes Positive and Neutral because of our class imbalance.
However, pretraining was able to boost the accuracy of the two classes
significantly.
⚙️ Section 5: Healthsea in production
With our pipeline built and the NER and Clausecat trained, we now have our
finished Healthsea pipeline! We can package
the pipeline via spacy package and install it with pip to use it directly in
python 🐍.
import spacynlp = spacy.load("en_healthsea")doc = nlp("This is great for joint pain")print(doc._.health_effects)
>> {'joint_pain': {'effects': ['POSITIVE'], 'effect': 'POSITIVE', 'label': 'CONDITION', 'text': 'joint pain'}}
5.1 End-to-End evaluation
Let’s see if our approach on segmentation and blinding works as we intended, and how the pipeline performs when we throw some manually created adversarial examples at it 😈.
Let’s start with a simple one: ”This helped my joint pain.”
nlp("This helped my joint pain.")>> joint_pain (Condition): Positive (0.99%)Great, the pipeline correctly detected joint pain as Condition and predicted a
Positive effect (with good confidence). Let’s try a few more:
nlp("This has made my reflux worse.")>> reflux (Condition): Negative (0.96%)
nlp("Did nothing for my insomnia.")>> insomnia (Condition): Neutral (0.99%)
nlp("I'm suffering from depression for almost a year now.")>> depression (Condition): Anamnesis (0.85%)
As we can see, the pipeline works for simple reviews, but what about the tricky ones?
nlp("This is perfect for knee pain but it did nothing for my hip pain though.")
Clause: "This is perfect for _CONDITION_">> knee_pain (Condition): Positive (0.99%)Clause: "It did nothing for my _CONDITION_ though.">> hip_pain (Condition): Neutral (0.95%)
Hooray 🎉! Our segmentation worked as intended and predicted both Condition
entities correctly. How does our model perform if we can’t split and can only
rely on blinding?
nlp("Good for heartburn but not throat soreness.")
Clause: "Good for _CONDITION_ but not throat soreness.">> heartburn (Condition): Positive (0.94%)Clause: "Good for heartburn but not _CONDITION_.">> hip_pain (Condition): Neutral (0.98%)
What about the Anamnesis class and the patient information?
nlp("The doctor diagnosed me with insomnia. After taking this product my symptoms disappeared!")
Clause: "The doctor diagnosed me with _CONDITION_.">> insomnia (Condition): Anamnesis (0.98%)Clause: "After taking this product my symptoms disappeared!">> Positive (0.99%)
Patient information>> insomnia (Condition): [Anamnesis, Positive] -> Positive
Our patient information logic works as well!
Some might say that I cherry-picked these examples and…. it’s true! While thinking of examples, I encountered a bunch of misclassifications. Let’s have a look and try to find out why the model predicted them wrong 🕵️♀️
nlp("This helped my joint pain")>> joint_pain (Condition): Positive (0.99%) (Correct)
nlp("This helped my joint pain barely")>> joint_pain (Condition): Positive (0.99%) (Wrong -> Neutral)
My eternal nemesis ”barely” is not recognized by the model as an influence on the classification. My theory is that, because I’ve never encountered a review while annotating that used the quantifier “barely”, the model isn’t able to resolve it. To fix this we need more annotations! 😄
nlp("Caused joint pain. Caused energy.")Clause: "Caused _CONDITION_.">> joint_pain (Condition): Negative (0.96%) (Correct)Clause: "Caused _BENEFIT_.">> energy (Benefit): Negative (0.96%) (Wrong -> Positive)The word ”caused” is mostly used in negative contexts instead of positive
ones, thus biasing the final classification towards Negative.
nlp("This is really bad for skin. I can't sleep because of this product.")Clause: "This is really bad for _BENEFIT_.">> skin: Neutral (0.80%) (Wrong -> Negative)Clause: "I can't _BENEFIT_ because of this product.">> skin: Neutral (0.99%) (Wrong -> Negative)In both cases, our pipeline fails to predict the Negative label. As we’ve
seen, the Negative class performs the worst out of the four classes, as it’s
also the one with the least training data.
To sum it up, we can see that the pipeline works but still needs training to make it more robust.
Explore the pipeline yourself at HuggingFace Spaces! (Try to break it 😈 and let me know about it on the spaCy discussion forum)
5.2 Large-scale analysis
To make the potential of our new NLP pipeline more tangible, we used it to analyze the whole IHerb dataset of 1 million reviews and try to give product recommendations based on the results. We won’t cover how we built the architecture around it, but instead, discuss interesting challenges we had to face.
Explore the results of Healthsea on real data at HuggingFace Spaces!
5.3 Fake reviews
Since all our data is based on user-generated reviews, we have to think about fake reviews. They artificially influence ratings and cause distorted results. So the very first question was:
How can you tell if a review is fake by just looking at the text?
And my answer was: “You can’t.” (Maybe you can, but I can’t 😁)
That’s why we look at the customer instead, and search for suspicious behaviors such as:
- Writing multiple reviews a day
- Having many reviews with either 5 or 0 stars
- Writing reviews with the exact same content
We applied these rules to our IHerb dataset to see how many shady reviewers we can catch:

For the shady requirements, we used the dataset to calculate the mean to serve as a threshold. For example, the mean of reviews per day is 3, so if a customer wrote more than 3 reviews a day, the customer was flagged as potentially shady.
Note: The percentages don’t add up to 100% because a customer can fulfill multiple requirements at the same time.
With these simple rules, we were able to detect that 12% of all customers are “shady”. Their reviews will receive a penalty score to reduce their influence on the results. We assume customers with only one or two reviews to be innocent (until proven guilty 🚓 )
5.4 Scoring results
When giving product recommendations, which indicators tell us which product is better and which is worse? For every health aspect mentioned in a product review, we calculate a score. We could just aggregate these effects, and consider the product with the most positive effect on a certain health aspect to be the best. However, it’s a bit more complicated.
We have to take the total reviews per product into account since products with a high number of reviews have a higher chance to mention a certain health aspect than a product with fewer reviews.
Let’s start by scoring reviews per health aspect. Here are our variables:
| Variable | Values | Info |
|---|---|---|
| effect score | Negative -1, Neutral 0.25, Positive 1 | Neutral is weighed above zero since it’s useful to show products where certain health aspects were at least mentioned. Even if the product didn’t help one customer, it may help someone else. |
| rating score | One star -1, Two stars -0.5, Three stars 0, Four stars 0.5, Five stars 1 | Including the product rating acts as a double check for misclassifications. If the model falsely predicts a positive effect instead of a negative, the rating could be used to partly correct / fine-tune the score. |
| helpful score | 0, float('inf') | |
| shady score | Shady 0.25, Innocent 1 |
Formula for reviews:
review_score = (effect score + rating score) * helpful score * shady score
After we scored every review, we can aggregate them to their respective product. Because we need to include the review count ratio we have two additional variables:
- summed review score
- total reviews mentioning health aspect
- total reviews
Formula for products:
product_score = agg_review_score * ((review_mentions/review_total)+1)
We use the percentage of mentions in relation to the total count as a score booster. This behavior will help products with fewer reviews to receive more scores when their percentage of mentioning a health aspect is high. To verify that, we performed some experiments:
Product 1: 746 Score (639/29497 Mentions) | 2.17%) | Review score: 730 | Boosted by: 15.81Product 2: 675 Score (764/70852 Mentions) | 1.08%) | Review score: 667 | Boosted by: 7.2Product 3: 506 Score (602/25050 Mentions) | 2.4%) | Review score: 494 | Boosted by: 11.88Product 4: 506 Score (820/2146 Mentions) | 38.21%) | Review score: 366 | Boosted by: 139.87Product 5: 357 Score (894/7936 Mentions) | 11.27%) | Review score: 321 | Boosted by: 36.19Because product 4 has the highest mention ratio it gets the highest boost
5.5 Clustering health aspects
Health aspects can have many synonyms or similar contexts such as: ”sore throat”, ”itchy throat”, or ”swollen throat”. To improve the search, it’s a good idea to cluster aspects together. To do that, we use our pre-trained weights to calculate similarities and cluster entities at a 90% similarity threshold :

🚀 Section 6: The journey
We did it! We’ve successfully built our Healthsea pipeline and can now provide product recommendations based on what reviewers say. We trained our own models with custom labels and data while also creating entirely new components within the spaCy ecosystem. The architecture of Healthsea has been developed throughout the last two years and began with just a simple rule-based sentiment-analysis, that didn’t even work.
I started the project together with Philip in 2019, during this time we were both interested in applying Machine Learning and NLP to health-related topics. Since we both knew a bit about supplements, we often received questions from friends or family members like: “what would you recommend for glowing skin”, or “do you know a supplement that helps with knee pain?“ So, the first idea of Healthsea came up. Our initial idea was to create a vast knowledge base based on thousands of user-generated reviews in the healthcare domain. The idea evolved throughout 2020 until we built the very first version of Healthsea with spaCy which also became the topic of my bachelor thesis. After my graduation, we got the amazing opportunity to further improve and work on the project at Explosion.
For that, I deeply want to thank Sofie for being the most amazing mentor and the whole Explosion team for their unlimited support and love <3.
It was a fantastic journey that reached its first milestone and we already have nice ideas that we want to try out in the future 🎉
- Apply Relation Extraction & Coreference to identify product mentions in the text
- Integrate Entity Linking with ICD-11 for Conditions
- Get more data & annotations (Reddit, Amazon, etc.)
- Use graph databases (e.g. Neo4J) and other powerful search engines (e.g. Jina AI) for returning product recommendations.
I hope you were able to get some interesting insights into the project and perhaps even some inspiration for your own work.
Thank you for reading! ❤️


